
Week 1: Line, Gesture & Construction
Welcome to first week of this online class of Imaginative Drawing & Illustration. I really hope you enjoy your time over the next 9 weeks and get a lot out of the experience. Just a bit about the weekly tutorials, It’s been a bit of a balancing act working out what to put in and what to leave out in terms of illustration theory. Like all art forms the well is often bottomless and goes as deep as you are willing to go yourself. So these lessons will be a bit of a 'highlights reel’ of some of the key fundamental ideas and skills I find have been invaluable in my own illustration practice.
Each week I'll open up the weekly class by activating the green button in the glass room, feel free to work through the notes and videos I share at your own pace. Most this content will be theory based, with notes from myself and video content that I find is relevant to the topics. I had intended to create my own, but with there being such awesome videos already out there, I thought I would let some other experienced voices have their say and leave my rambling for our online sessions and meet ups.
In the weekly online meet ups I'll be covering a combination of illustration theory, digital painting/Photoshop techniques and guiding you through the illustration process with feedback and critiques. So if you have any technical questions etc, keep note of them and we'll go through it on the hangout.
Here's a bit of a rundown for the hangouts and meet up for this week:
Sunday Meet up: : FIrst meet up, get to know each other a little and do some sketching. The focus of the day will be on the interior space at the moon cafe in Northbridge, However if you want to sit and draw cat's all day, I'm not going to stop you.
bring your sketch pads, pencils and drawing tools, the objective of the day is to capture geometric shapes and curves with out the use of rulers or french curves. Focus on proportion, angles and obtaining solid lines with minimal tries.
Online Hangout: Share with the group what brief you going to work on. Share some of your initial ideation and research, if you have had time to do any. Also can share where we are at with our weekly exercise.
I'll be running through some Photoshop techniques and tips for those who are more focused on the digital stuff (which seems to be a majority).
Ok, so that's everything else out of the way, let's get started!
In most styles of drawing, there are 4 main purposes that line serves: Gesture, Construction, Contour and Rendering (hatching, cross hatching etc). This week, we’ll be focusing on the use of line as tool for gesture and construction, we’ll look at 3 different line types it is well worth mastering to be able to draw unassisted, we'll look at line weight and line quality and what this can tell us about the form, and we’ll look at some simple idea generating exercises involving making forms with line. I’ll be trying to keep the delivery of these ideas very simple, as most foundations are, but like with all weeks to follow, push through the exercises and take them to where your heart desires and see what you can come up with.
Using Line to imply gesture and construct an image:
Often the biggest mistakes that everyone makes when starting an image, is focusing and refining one section (adding shading and detail) before they have an idea of how the rest of the image is going to work. This approach, despite how rewarding it is in the beginning when we get that small patch looking really really good, can back us in to a very uncomfortable and disheartening corner. This principle can translate in to almost anything that requires planning (planning a holiday, planning a dinner evening or even planning a class).. It’s always best to work out the broad strokes firstly, to understand where we are going, before refining the details.
This is where Gesture drawing and construction lines are invaluable. Gesture drawing is basically the technique of moving your pencil/stylus/pen over the paper as quickly as you can, to channel the movement and flow of the image you have in your head. You're not looking to create the image in its final resolved state, but rather create an impression of the flow and movement you are seeking the image to have. The idea is to get the ideas out quickly and to open a free flow of communication between your brain and your hand. This process of drawing is most commonly paired up with the idea of doing thumbnails, but I find it handy even when working on the final composition.
Here is a little video which is a part of a great online series by Stan Prokopenko, where he gives a bit of an introduction to the concept of gesture Drawing.
In this video he focuses mainly on Gesture drawing in human figure studies, however the same logic and approach can apply to any form you are trying to capture, or even a composition as a whole.
Here, Stan talks a bit about the difference between gesture and contour lines. There are also a few examples of different approaches to gesture around the 4min40s mark, so feel free to skip ahead to this point if you don't have a lot of time. Personally I prefer the scribbly line approach, and even more commonly now days the fill approach when doing my initial gesture drawing (you'll understand what I mean once you've watched the video).
Here is a great snippet of a cool video with comic legend Jim lee with some old man who can't seem to keep his face out of every damn marvel movie.. They're talking about Jim's process of mapping out an image. His Gesture lines aren't very visible on this video, but pay close attention to the way he moves his arm and his hand around the board.
Also worth noting, Jim has drawn this particular view of the anatomy many times before, so he bypasses the construction line stage after the gesture and before the contour. Construction lines are often one of those things, that you may think you don't need them until you get frustrated that a particular angle isn't working, or the proportions are off and you realize that you do. They are a good tool to get accustomed to using.
This is probably a good point to introduce the three lines it's worth while to be able to draw unassisted, they are the:
S-Curve
Straight Line
Arc (& Circle)
(you would have heard Proko talking about Straight lines, S-Curves, and C-curves (what I call Arc's) in his video). These 3 line types are the most common types of lines in both motion and form, and being able to draw them unassisted is a very powerful thing. The way to train these line types is simply, to train them.
- Grab a sheet of paper, a pen or pencil, and fill it with S-Curves, Straight Lines and Arcs.
- Practice hitting particular points, getting the line as accurately as possible and moving continuously with out stopping.
- You want to focus on creating a smooth unbroken line that fits the shape you are seeking.
- Draw from your elbow and shoulder, not from your wrist, and work out what direction (whether you are pulling the line towards you, or pushing it away) achieves the best result for you.
These line types are very important to master for processes like inking or penciling final line-work on your illustration, but knowing these curves and straight lines well, will enhance your ability to generate gesture drawing that captures the movement you are after with out too many tries. Once you have the ability to draw these lines unassisted, it will free up sooooo much space in your brain to focus on other aspects of your image construction.
Just a bit on Construction
Construction Drawing, or Construction lines is probably the most commonly known line type that is pushed in drawing, so most people should have had some experience with them. Basically, construction lines are used to break down complex forms in to simpler geometric shapes that can be used to make up that form. Its a process of building the forms in an image.
When working with construction lines, you will be initially paying close attention to things like perspective, proportion, angles and the general mechanics of the structure you are building.
One of the best ever books I have which talks to great extent about using construction lines, is 'How to draw the marvel comics way'. This book goes in to so much detail on this topic which is quite deep, and is well worth buying.
Here's a video which must have come out to co-inside with the book.
The power of Contour Line quality
This topic isn't intended to be a focus for this week, as it doesn't really come about in our illustration process until later on (using our illustration project as a guide), but I thought it was worth mentioning and that topic is Contour lining. Contour lining is basically the line that represents the edges of a realized form, and is the name given to the line in polished linework that is often left visible in some imagery (comics, cartoons, etc).
On top of being able to create a smooth unbroken line, another good technique to master with contour lining is the ability to manipulate thick and thin lines to communicate the nature of a form
In Jazza's video, he covers working with a varying line weight with your contour line and also details how to achieve this in Photoshop. What's also worth adding is that line weight is great for depicting the weight of a form. An easy way to think about it is where ever you thicken along a line will be read as heavier in terms of weight, so it may be best reserving your thickest lines for areas of your image where you want to convey a heavier weight of the form: eg where jazza thickens under the chin and under the lip of the female face. The tapering along the line also depicts where the tension of the line is being held (eg corner of the lips, the corner of the eye).
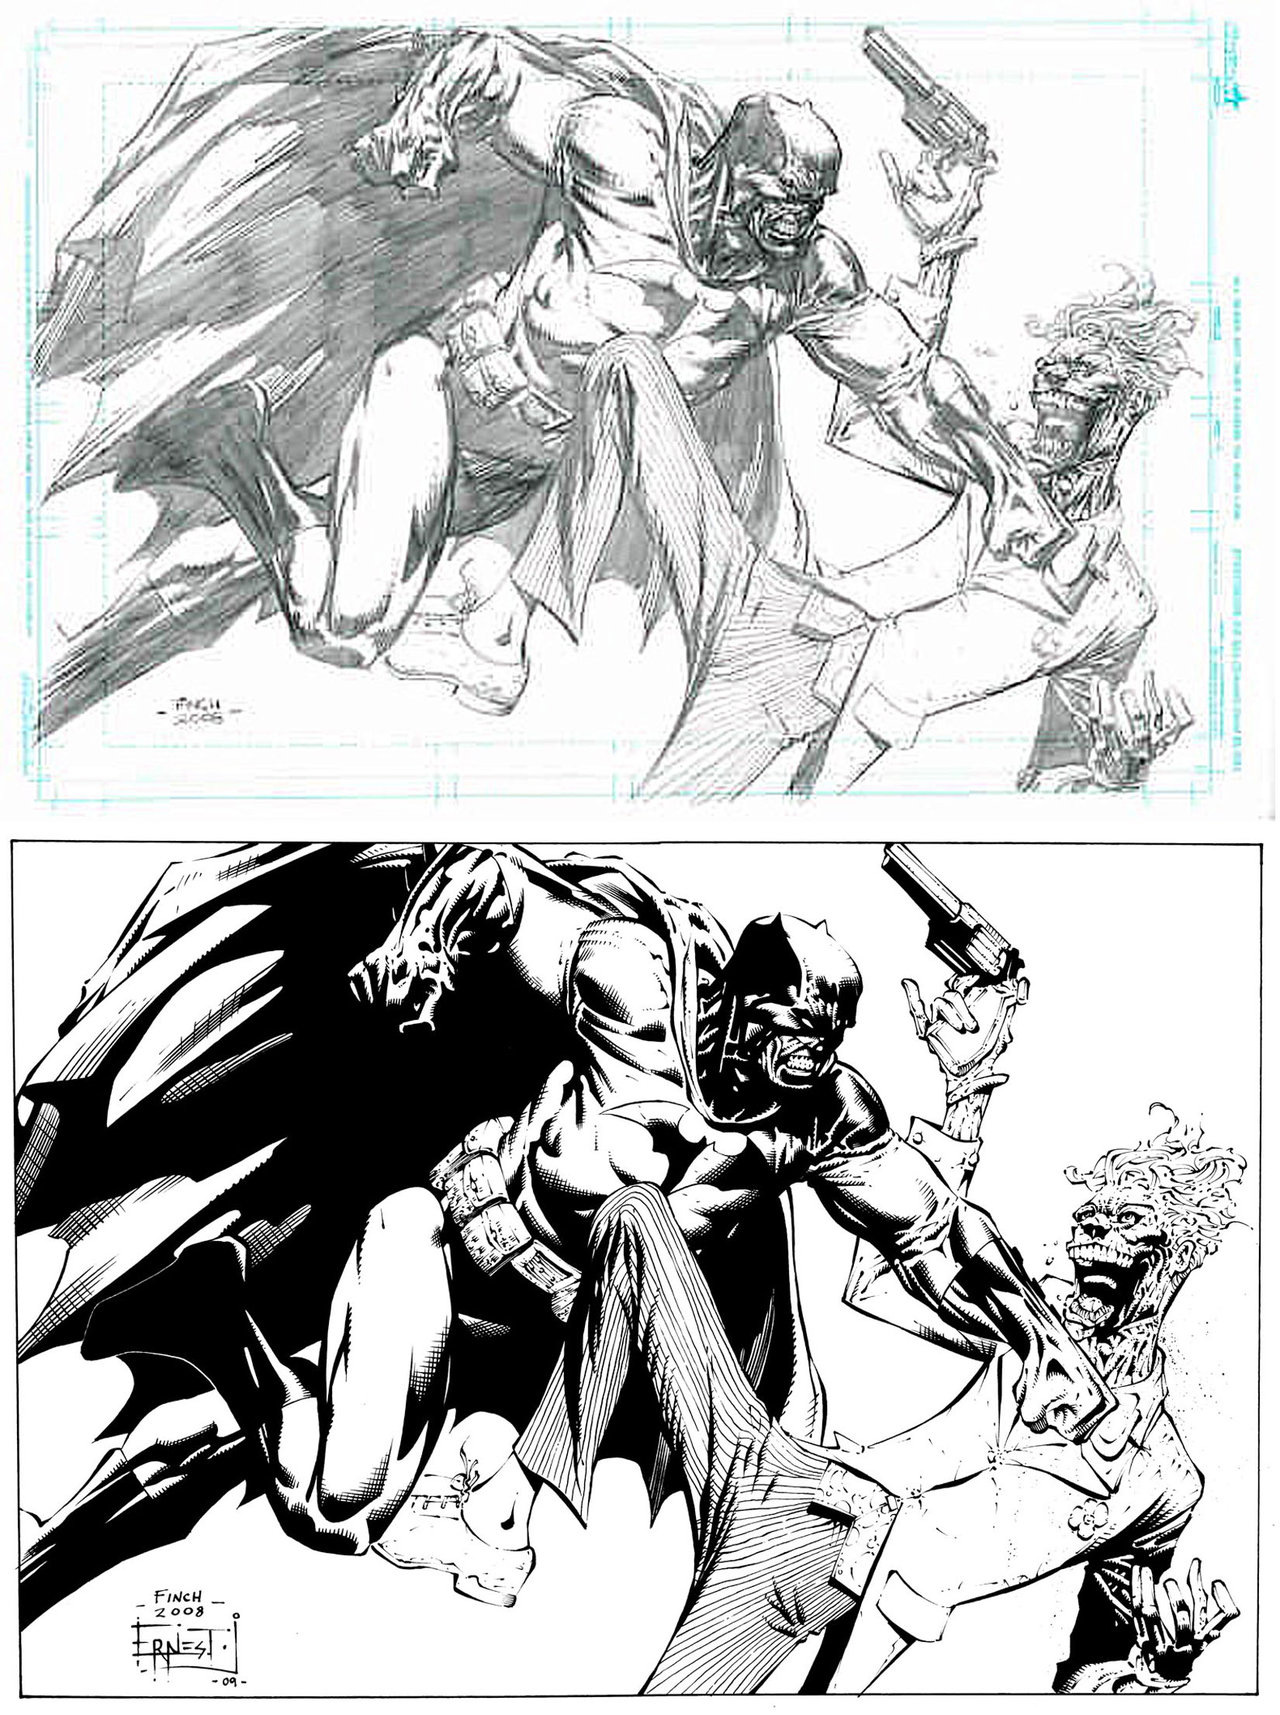
Illustration by David Finch. Here's a link to his awesome tutorial on heads: http://www.thegnomonworkshop.com/store/product/819/Dynamic-Figure-Drawing%3A-The-Head
Get the whole series if you can!
Another application of this thickening technique is to use heavier line weights to depict areas that are in shadow. Comic book artist David finch is a classic example of this approach, he will often build up areas where the form is in shadows with thicker darker lines as apposed to areas with light. I remember him saying as well that he tends to focus on drawing in shadows of the forms, rather than just their contours. (If you can get your hands on his tutorials through the gnomon workshops, I highly recommend them!)
Another idea here is to leave some lines for the viewers imagination to fill in. These suggested lines serve the purpose of suggesting the shape of a form with out closing it off completely from the other forms next to it. Eg eyes, mouth.
Ghosting the line
Another point worth adding on to jazza's video is the idea of Ghosting the line. When we work with pencil and paper, we don't have the luxury of cntrl-Z, so a good approach is to practice a line before we commit. Hover your pencil above your page, and move your hand along the path you are planning to draw. Do this several times before lowering your pencil. This technique is worth remembering when doing large straight or large s-curve lines.
THIS WEEK'S EXERCISE
Step 1: Quick Gesture Sketch
Step 2: Bring out forms either through construction line or blocking in shapes. I personally enjoy the surrealist nature of this exercise. Don't be afraid to push your imagination.
Step 3: begin to refine forms and make design choices about lighting, tone etc (these topics will be covered in weeks to come, but just push it as far as you can or choose)
Step 4: Refine details and push image as far as you can. You can introduce color in to earlier stages if you feel comfortable.
Scribble Ideation Exercise.
We've all at some stage of outlives, laid on our backs and starred at the clouds trying to make shapes and images in them. And some of us may remember watching the show mr squiggle as a kid (if you have no experience of either of these you desperately need to step away from the computer, and go look at some clouds). This exercise is similar to both those in that we'll be relying on our imagination to work with what's already on the page and to be open to those happy accidents that pop up along the way.
Process:
Choosing one of the three jpegs below or by creating your own abstract gesture drawing (you can do as many as you like)
- import the file in to Photoshop, duplicate the layer (always good to do to preserve a copy of the original).
- Rotate the copied layer until you find an angle that you want to work with.
- lift up the brightness, create a new layer to work on and begin to bringing out forms that you see.
- Begin broad as you start with and identify shapes that interest you.
- Let your imagination run wild in the early stages. let the curves and shapes guide the choices you make, not logic and realism (there will be time for those thoughts later)
- Once you are satisfied that what you have on your screen is a realization of the shapes you had been able to see, start exploring the nature of these forms. What do they look like to you? Start implimenting some broad details and design choices.
- From here on in it's just a matter of refining and rendering. Take these images as far as you'd like.
Some Scribbles to work with:
Why is this a good exercise?
I'm no fancy brain doctor, but the way I understand it is this exercise, and others like it, work the problem solving part of our subconscious. It helps us to think laterally on the go, so that when we are immersed in our images later on, faced with the problem of something 'not working' our brains will kick in and say "hey I know how to think to problem solve something like this..." and we move on forward.
But also it's a fun exercise in embracing happy accidents. Happy accidents are those decisions that come about not because we planned them, but because other choices and circumstances placed them in our lap. Ever started drawing something, laid a line down in the wrong place but thought to yourself, "hey that actually works better than I had intended!".. That's a happy accident.
SUSPENDING JUDGEMENT
This is another vital element to this exercise, the early stages of an illustration and any form if idea generating/brainstorming we do.
When we are exploring ideas, we want to do so freely. We want our brain to explore beyond what we commonly see and know well. If once our brain gets an idea, we immediately shut it down, we loose the opportunity to explore where that idea could have taken us. Suspending judgement basically means holding off saying an idea is 'wrong' or choosing a solution until you have given the process an opportunity to lead you somewhere interesting and new. Keep this in mind as you are planning out the broad strokes of your images and in the exercise.
(I remember an art lecturer once spoke to me about this theory and I thought he was a crazy hippy at the time... I feel like I owe him an apology, it's helped me out a lot over the years.)